Category: Portsdown 4 build

  • Portsdown 4 build – powering ahead

    Every day I seem to relearn the wisdom of the old saying – “if it ain’t broke, don’t fix it!’ – and how it truly applies to reassembling equipment.

    Here are the immediate tasks I’m addressing as components arrive:

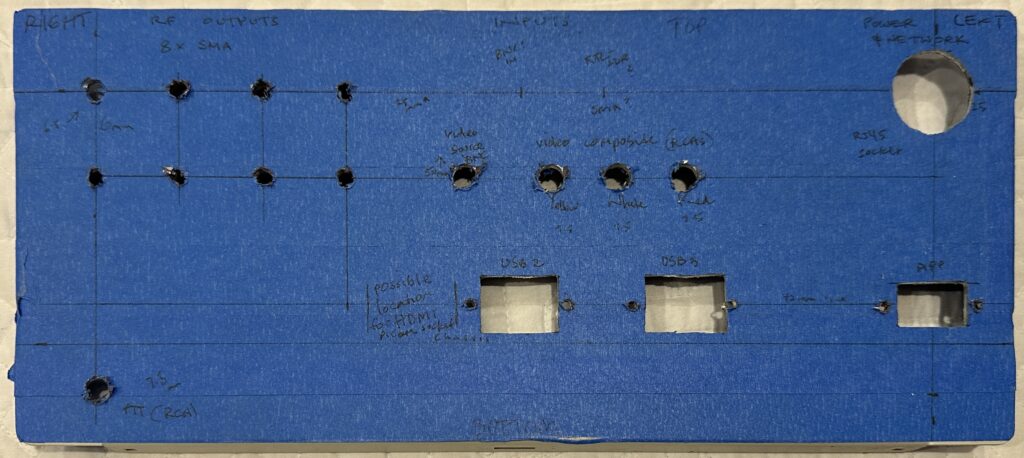
    • Ask myself how I managed to install the touchscreen upside down!?! Or to put it another way – turn the whole front panel upside down and put controls upside down on the wrong side of the display?!? Luckily it’s a simple fix (Menu 3 > System Config > Invert Touchscreen)
    • Reconnect Raspberry Pi and the touchscreen and the fans on the Pi to confirm all working as before disassembly for drilling work on front & rear panels. All good!
    Success! – Portsdown updated software and sent a testcard across the world via the internet. Now for the RF.
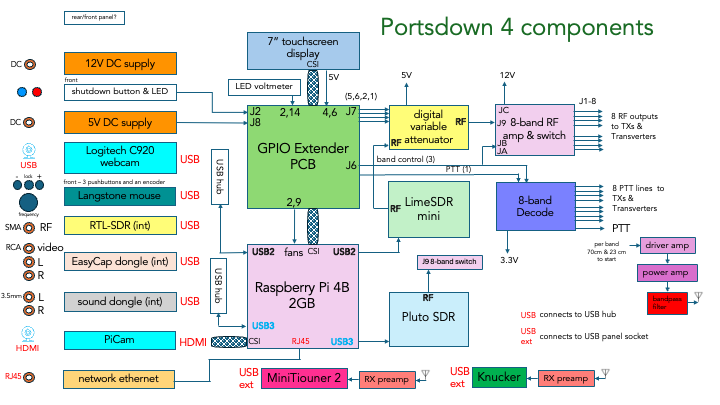
    • Plan how to implement 5V distribution wiring for all devices needing it – all (including of course the Raspberry Pi, to be fed from the XL4016 DC-DC power supply module (purchased from Mini Kits in Adelaide) set to deliver 5V from 13.8V via the Anderson Powerpoles on the rear panel. These include:
      • power for LCD touchscreen (via Raspberry Pi GPIO?)
      • Ras Pi fans (via the Raspberry Pi GPIO?)
        These two items simply require some way of extending the connections to the relevant pins on the GPIO PCB. (I’ll make “bespoke” dupont style leads with slightly heavier wire with appropriate connectors.)
      • a voltmeter display to confirm and monitor the voltage setting of the XL4016 PSU module – to deliver the appropriate voltage to the Raspberry Pi (5.1 or 5.2V). I’ll probably attach this near the PSU module as I’m not sure this small display warrants a presence on the front panel but we shall see… (This will depend upon how much the output varies depending upon the different 12V supplies that might be used.)
      • small 5V fans for Pluto & LimeSDR Mini enclosures? I’ve seen recommendations to do this on the BATC forum, and presumably if you’re blowing cooling air into a small enclosure, there needs to be a way for the warmed up air to escape?
      • two perhaps larger 50mm fans on the side walls of the main Portsdown enclosure??? Perhaps I need first to devise some way to monitor temperatures within the enclosure as the project progresses. This will have some bearing on the way I orientate the PSU module and its heatsinks.
    • Plan how to connect all the USB connected devices
      • PSU module to directly power the Raspberry Pi via J8 on GPIO, and two USB hubs, one powered directly from the PSU module 5.1V out, the other via one of the Pi’s USB sockets.
      • Raspberry Pi to power directly via GPIO: the LCD touchscreen display, the 2 x Pi fans and then via one of its own USB3 ports > the Adalm Pluto
      • C920 webcam – via the USB2 socket on the rear panel connected to the USB hub
      • Audio dongle – via microphone and headphone sockets on front panel to dongle on to USB hub
      • Video dongle – via three RCA sockets on rear panel through to Video Capture dongle connected to a USB hub
      • LimeSDR Mini – via direct connection to a USB hub
      • Langstone “mouse’ tuning encoder etc – via a connection to a USB hub
      • RTL-SDR dongle – via SMA or BNC connector on rear panel on to dongle and then to a USB hub
    • Now that there’s a switch and an LED on the front panel, install the shutdown circuitry as outlined on the schematic for the orginal GPIO break out PCB and omitted from the later one.
  • Portsdown 4 build

    After quite a lot of time thinking through what my plans might be for the specific bands and modes with the Portsdown 4 I’ve spent a few hours over a couple of days drilling and nibbling holes in the panels. When I first built it a couple of years ago I only managed to make the cutout for the 7” touchscreen and install a sheet of aluminium in the closure to act as a chassis to mount the Raspberry Pi.

    I am now – almost – able to connect it up and put the lid on it. I’m also finally installing the shutdown components for the Pi. I still have to work out how to mount one of the DSI to HDMI PC boards on the chassis and against the panel to enable a PiCam to be connetced via a regualr HDMI cable. This will probably involve a piece of aluminium to hold the tiny PCB and HDMI socket against the rear panel.

    The beauty of it all is that once the process has some momentum, things can move quickly.

    marked up and drilled and nibbled rear panel of my Portsdown 4 build demonstrating how urgently I need to invest in a drill press!
    The marked up and drilled and nibbled rear panel of my Portsdown 4 build demonstrating how urgently I need to invest in a drill press!

    I’m glad I was able to spend some time planning both the front and rear panels’ layouts. But I’m sure there’ll be many re-thinks and more probably, mistakes along the way, in spite of all the planning and thinking!

  • Portsdown 4 project back on track

    I’ve been building bits and pieces of what will become a digital amateur TV capability for just on five years! I lost my momentum after building a number of components and it’s only in the last few weeks I’ve found a renewed enthusiasm to get on with it!

    One of the main prods has come from watching the weekly DATV net on VK3RTV. Anyone anywhere can watch this either live via this BATC streamer link or via Ian VK3QL’s YouTube channel. The net attracts an energetic and skilled group who easily sustain a fast paced 60 minute video conversation. It’s very smoothly presented with lots of visual variety and useful information and very few technical hiccups. The Melbourne DATV amateurs seem to have a very professional sense of time and audience interest and keep the show moving.

    My other inspiration is the weekly BATC Oscar 100 net scheduled for 8pm Thursday which is either 6am or 5am(!) on Friday morning here in eastern Australia. I’m trying to work out how I might record it off the streamer while I sleep. This international net happens over the brilliant geostationary satellite QO-100 whose footprint unfortunately doesn’t include Australia, but it does appear to have boosted interest and activity in satellite communications and DATV in Europe. If I set the alarm I can watch this BATC net via the BATC streamer .

    a block diagram to help think through the interconnections between the different components makig up the Portsdown 4 DATV transceiver.

    This is the first result of my planning the build of my Portsdown 4. I’m sure it will change over the next few weeks. It’s also to help me work out which controls and connectors might go where on the front and back of the enclosure. I actually find this thinking very enjoyable.